

This is a long post – I want to provide all the details so you can learn from our experience
Here’s the #TLDR: Our Provenza oil finish maple floors were looking super shabby – scratches, dings and on top of that, had basically irreversible damage from painters tape that pulled off the finish and caused ugly streaky marks across the floor. We had to do something but had never owned hardwood floors before. After hours (ok days!) of researching and reviewing options (should we try to spot fix, refinish, or replace?) and many flooring contractor interviews later, we ended up going the refinishing route. We completely transformed our oil finish maple floors and made them durable, kid friendly, and super low maintenance. I’m happy to share our experience with you so you can learn from our long process in case you ever want to make changes to your oil finish maple floors.
The context: How did this all begin?
We bought a new home and immediately knew we wanted to repaint the walls. Within the first week of move-in, we hired a painting contractor who taped paper to our floors to protect them. But in an effort to do the right thing, they did the opposite. It took a few days to paint our entire home and that’s how long the tape was taped to our floor. We were admiring our walls and were excited about the final reveal but instead of joy when we removed the paper, we were surprised to see the tape rip the stain right off the floor. In my naivety, I thought it was just tape residue and could be wiped off. But we quickly realized it was much deeper damage. Our painter said they had never seen this happen in their 20+ yrs of painting (hmm? A bit unbelievable). This is where our hardwood floor adventure began.

Here was our problem with the floors:
- Oil finished floors require time and money to maintain and since we have young kids and a busy household – we had no time to appropriately and effectively maintain the beauty of oil finished floors. The maintenance and upkeep is pretty crazy (for us). And if you don’t properly maintain, you make the floors very susceptible to damage. If you don’t know what you’re getting yourself into, I will tell you.
- Daily – if you spill any liquid or food you must wipe right away or you risk staining or permanent damage. You can’t use too much water as that will damage the floors so that means no mopping. Cleaning products are more expensive.
- Bi-annually – To re-oil the floor on your own you can use an oil refresher but you have to make sure the floor is pretty clean and spotless before you do that or else it makes it look streaky and worse. Also, you may not be able to step on the floors for a few hours afterwards.
- Annually – Professional re-oiling can be thousands of dollars.
- We already had dark cabinetry in the home and the grey stain of the floors made the home feel sad. The floor coloring wouldn’t have been our choice.
- We invested so much in our home and couldn’t ignore the tape marks and live with the fact that our floors had streaky imperfections all over.
- We just moved in and were settling in, unpacking, furnishing the home, working full time, taking care of two kids, oh and also had to film (in the home) for an HGTV show.


The research process: I don’t have enough hours in the day
Ok, so we knew we needed to fix the damage, but knew absolutely nothing about hardwood floors! Me being the person that needs to learn absolutely everything about a problem before solutioning, started my detective/investigative work. If only I had more hours in the day to do this while working full time, caring for 2 kids at home and unpacking/setting up into a new house, all while in the middle of the COVID pandemic.
Our floors were from Provenza, specifically the Pompei collection – Salinas. The homes in our Del Sur neighborhood were built around 2016 by CalAtlantic which was eventually bought by Lennar. I believe Provenza provided the majority of hardwood floor options for this neighborhood. I also heard that they were really pushing the sales of oil finish floors at the time because it was coming back into style but not sure if the sales reps communicated how high maintenance the floors can be and how difficult it could be when you have young kids and dogs (which our neighborhood has a lot of – it’s like a family paradise here).

I thought I’d go straight to the source and contacted a Provenza rep who sold me their Provenza cleaning and spot maintenance kit. Minor damage such as light scratches and dings on oil finish floors (if maintained properly) are supposed to be easier to repair by just spot treating with oil — the damage is supposed to be buffed out. So I thought this could fix the issue. The reality, it made the situation worse – it looked like a shiny oil streak on the area I treated AND the tape marks were still there.
Then, I called many flooring specialists who said they may be able to re-stain/oil over the tape marks – All they would need to do is mix stains to try to find the perfect match because Provenza didn’t sell the specific color stain and even if they did, they wouldn’t sell retail. When the flooring specialists came in-person to check out the damage, most said there was no way anyone could color match perfectly. One person did attempt to re-stain but he couldn’t do it – after many samples – I appreciated his effort.
I called back Provenza and they said that if you don’t maintain the oil floors AND if you use the wrong products, it can really damage the floor and make it much more susceptible to scratches/dings. For example, you CAN’T use typical hardwood floor or all purpose cleaners or even natural cleaners like vinegar – this eliminates like 90% of the cleaners out there. They’re all too harsh and abrasive. After using these types of cleaners, your oil finish floors will become very easy to damage. Proof was when I used my fingernail and scratched a line into the floor. WHAT?!
The specific Provenza Salinas plank was also now out of stock, so we couldn’t just replank. Also the tape damage was across multiple boards which would mean replacing 30% of the floors anyway.
Solution: Time to make the call
Our options were to refinish or re-do ALL the floors. But keep in mind we have 2 little ones and it was in the middle of the COVID pandemic, so we didn’t want to move out of our home for 2 weeks. In addition, we just spent a considerable amount of money to purchase our home and replacing floors was not a cost we wanted to spend.
We seriously considered just replacing with LVP – because you could just lay the LVP over the hardwood floor and you wouldn’t need to move out and we could select the exact style / look. There was predictability in this choice and it just seemed easier and more affordable. We were very familiar with LVP as it was what we had in our old place and it was so durable – absolutely no scratches with 2 little one’s throwing and banging hard objects on the floors every day.
But our friend and realtor, Rannie Greer, convinced us we shouldn’t destroy these beautiful floors even if they were damaged. It would be such a shame. Plus, hardwood floors are a good value/investment for re-sale purposes.
So we made the call to refinish the floors. We preferred lighter floors to offset the dark heaviness of our cabinetry so we were curious to see what the natural maple color was underneath. I had seen oak floors everywhere – they were so popular, I never really heard much about maple floors – maybe because they’re associated with bowling alleys, gym floors, and 90’s style cabinets? I called Provenza again to ask what maple species our specific floors were from and even talked to the Provenza hardwood sourcer. He told me they were from a variety of maple grades and possibly different species but didn’t know for sure (sugar maple, black maple). My thought was that they didn’t really care if the maple was all the same grade/species since Provenza was going to stain, wire brush and add saw marks anyway. For a more thorough review and analysis of Maple floors see FlooringGirl.


The process: Revealing the floors
The Provenza planks are not solid hardwood, but engineered so just the top layers are the real maple. This means that you can only refinish once, possibly twice for the lifetime of this product before you reach the plywood/other material underneath. So we had only one chance and didn’t know the true natural color of our floors – they could be pink, yellow, grey tones? But one thing we did know, they would be lighter. We decided to sand off everything and see what we got. If the color wasn’t to our liking we would re-stain BUT we found out maple is known to be very difficult to stain due to the close grain – it can look blotchy and uneven and requires the work of a very trained flooring specialist with probably years under their belt.

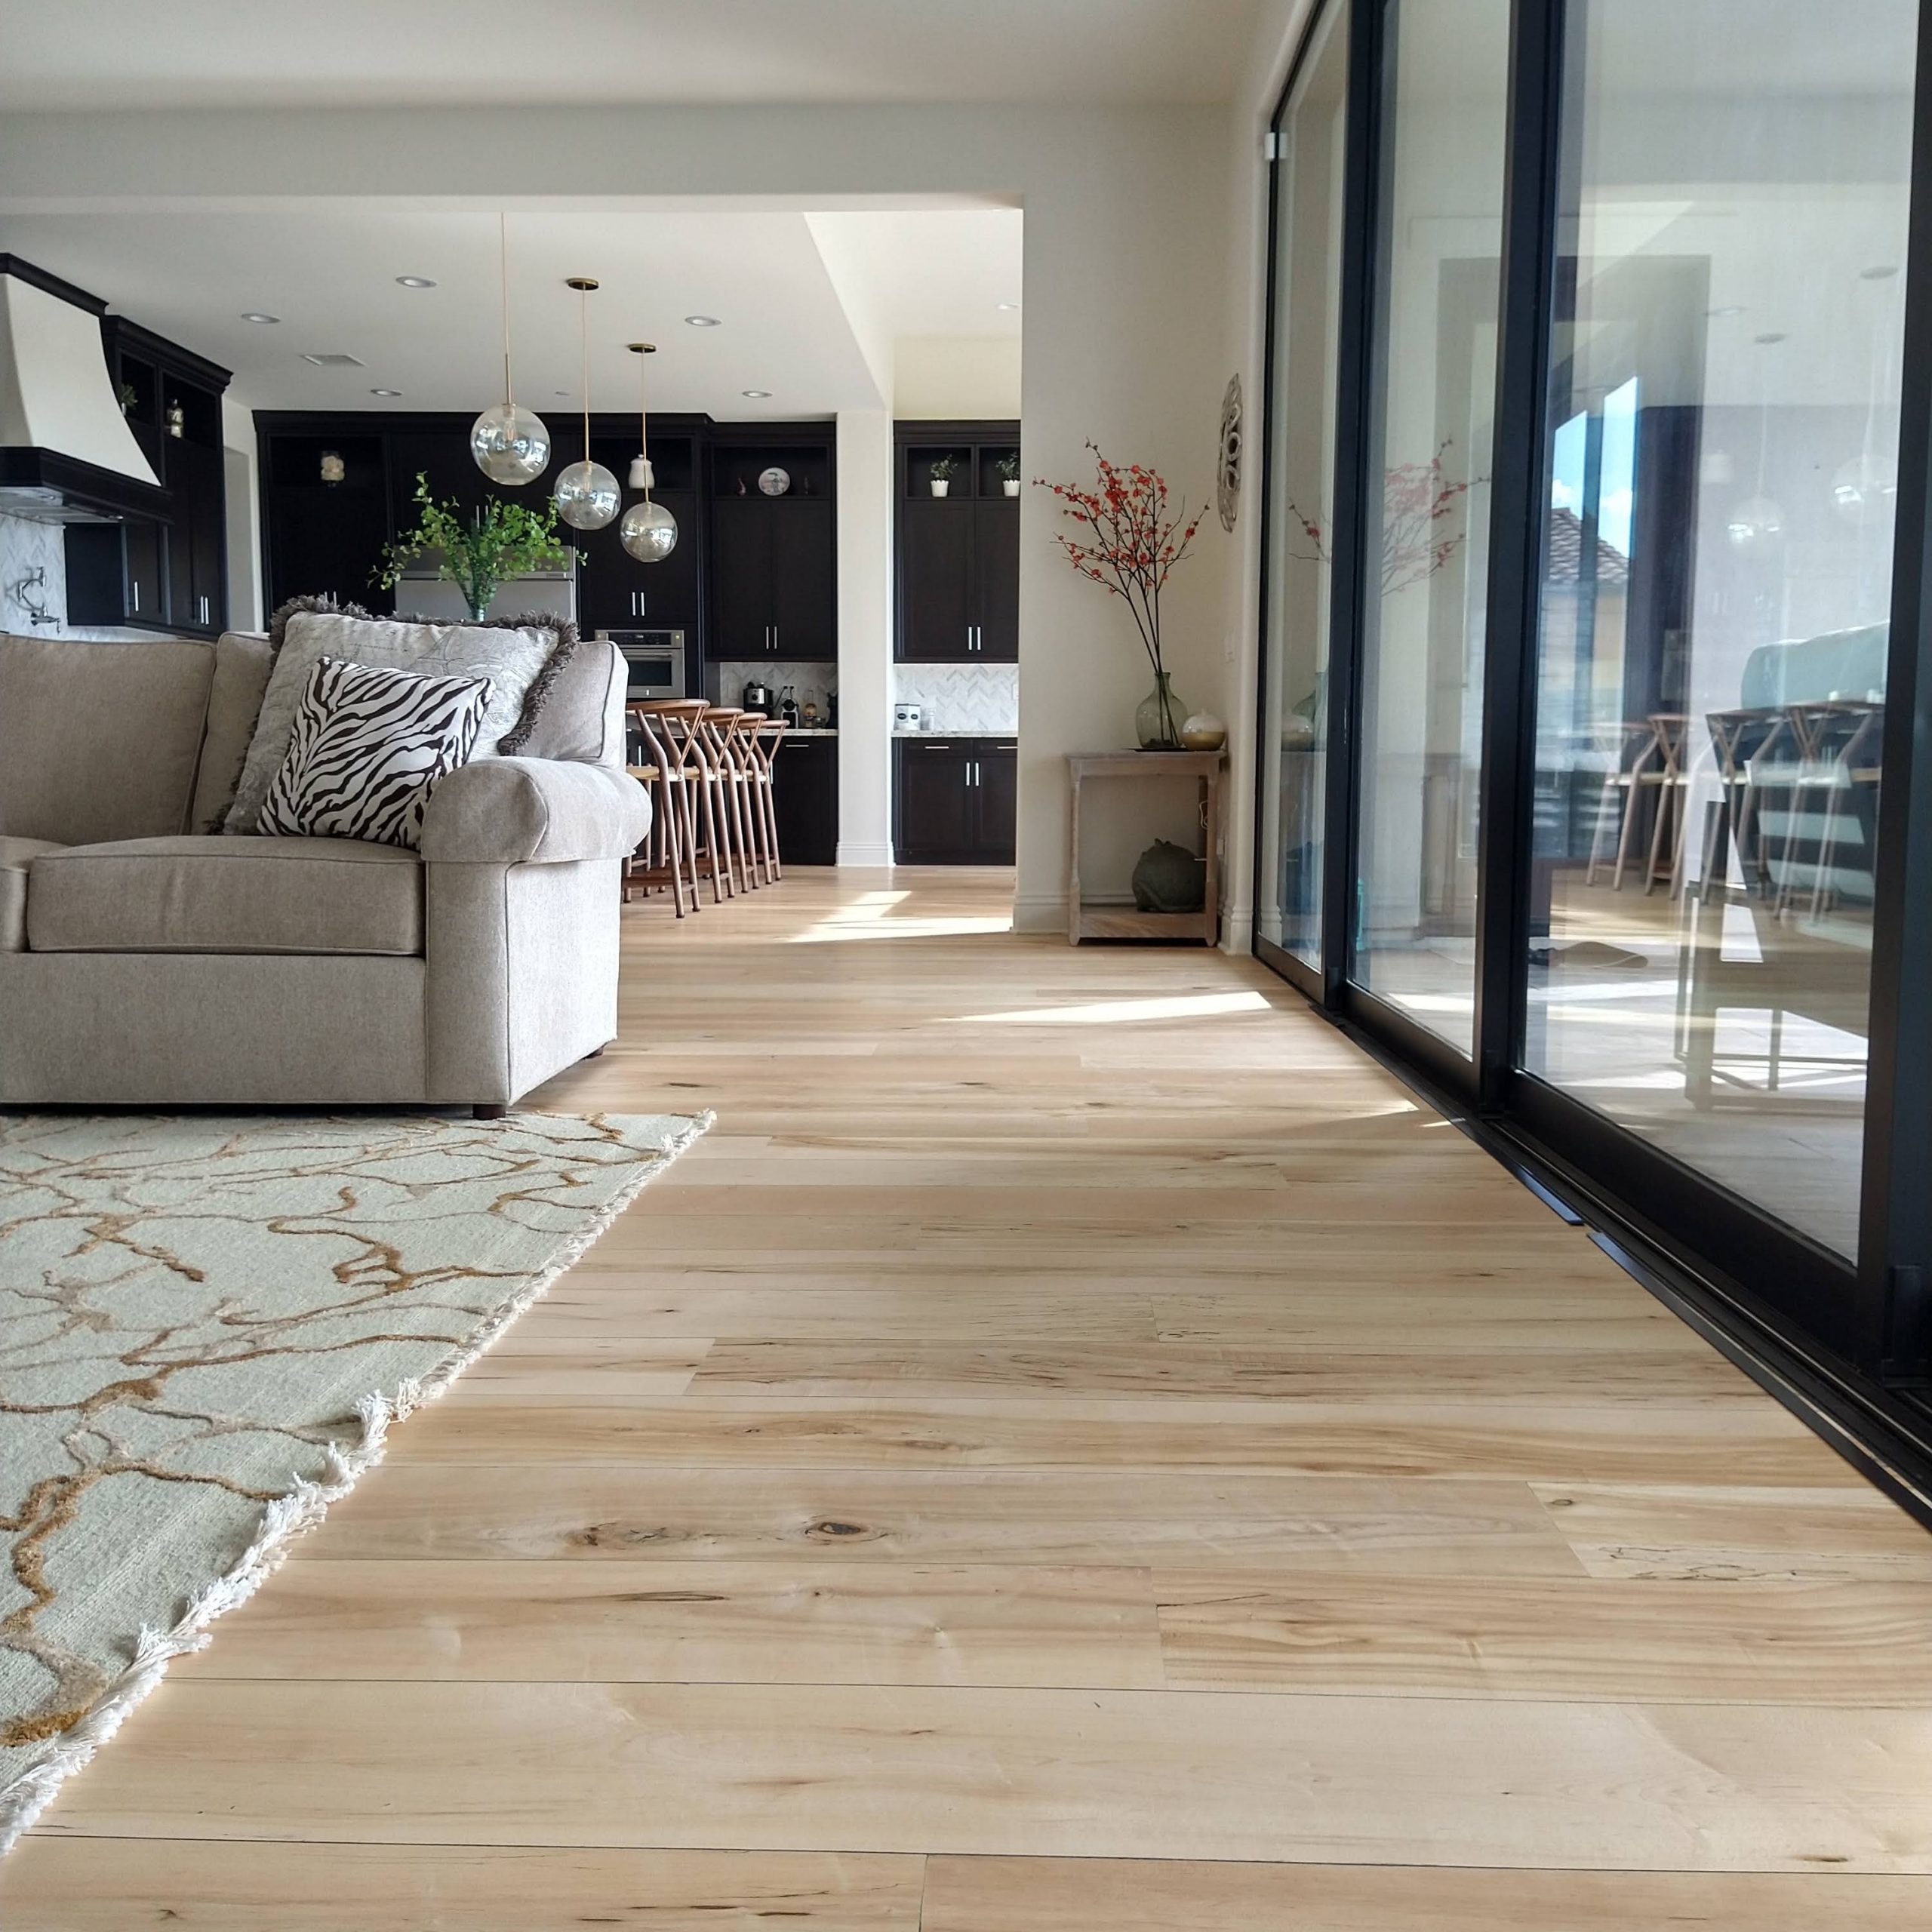
Good news though! When our flooring contractor began the sanding process, we were so happy and surprised that each individual plank was very different and had so much character – that when you put them all together, they really worked very well in harmony together.


We even found many planks that had the rare birds eye effect! Only 1% of maple (and only maple) has birdseye characteristics. It makes the wood look holographic and three dimensional – especially in sunlight. Birdseye maple, one of the rarest kinds of wood on the planet is hard to source and typically used for fine furniture like jewelry boxes and for string instruments.


So now that we uncovered the inherent beauty of our maple floors, we wanted to protect them and make them as durable as possible. We were not going back to oil finish so went with a water based polyurethane (more about the pros and cons of oil based vs water based poly). Because sunlight can yellow maple overtime, adding a water based polyurethane can really help prevent the color change. After testing a few natural matte finishes, we decided on Bona Traffic Naturale because we wanted to get as close to a natural untreated matte look as possible and something that could withstand high traffic use. There are two kinds of Bona Traffic (Traffic Naturale and HD)


The entire process took 2 weeks – and we didn’t have to move out! The crew helped remove all of our furniture into our garage and tarped up everything to eliminate as much dust particles as possible. BUT be wary, there will still be a lot of dust afterwards so you do need to do a thorough dusting/cleaning afterwards. Most of the time was spent sanding and the detail precision work required to sand around our kitchen island, cabinets, baseboards etc.
A note about the casings and baseboards – They will get a bit scuffed up so you have the choice to replace them or live with it. The marks were so little that we decided not to replace. If you have black baseboards, you can use a black sharpie or dry erase marker or even black nail polish and you could cover it up yourself.


In terms of inconvenience, we could not use the kitchen for a couple of days while they were working in that area (yay for takeout!), we had no furniture so ate outside and we couldn’t walk on the floors for about 8 hrs when they were adding the coats of poly. We mostly hang out upstairs where we were not refinishing the floors because they were not damaged (totally different floor – light grey oak w/poly finish).


Care & Maintenance
This section contains affiliate links where if you make a purchase I earn a commission at no cost to you
The daily removal of dust, debris and gunk is the most important. We really only clean the kitchen and dining area floors and focus specifically on the dining area. So we use a robot vacuum, regular Swiffer, microfiber dry mop, Dyson hand vac and a Swiffer WetJet (wood). I sweep the kitchen twice a day – after breakfast and after dinner and use the Dyson hand vac daily. We use the robot vacuum 2x/week. And then mop every other week (only the kitchen & dining area).

To rug or not to rug, that is the question. We went back and forth on having a rug under the dining table. Aesthetically, it looks better to have a rug, but practically, it’s better to not have one, especially when you have young children. We had initially thought it could protect the floor but learned that it could cause more damage! A rug makes you less likely to clean because the rug will hide the imperfections of spills. You won’t see the spills and they’ll eventually seep to the bottom of the rug and on to the floor which you won’t see and it will just stay there until you remove your rug. But who is actually going to move their dining table to look and clean under a rug? UNLESS you know you don’t care about how your floors look under your rug because your dining table and rug will stay there forever 🙂


We also use a 3 prong approach to protect from scratches from the high chair because that’s where we saw some dents. The chair legs have felt pads covered by a chair sock, over a clear office chair mat. Note this does not protect against food spills from baby’s strong arm of the law flinging food at 1000 mph.

The end: The worst can be the best
This flooring adventure has been a great learning experience. Sometimes when the seemingly unfortunate happens, it can lead to even better outcomes. In this situation, the worst transformed into the best. It was a blessing that Provenza selected such a haphazard unique blend of planks for this specific collection. To get this look, you’d need to purchase the original Provenza engineered planks first, then refinish them. Or you would need to custom order the planks – both options being considerably timely and costly. So for those that have Provenza floors (I can only vouch for Salinas plank) and want to make a change, you’re super lucky because what’s underneath can be absolutely breathtaking.
For someone that never really paid too much attention to floors, I now find myself noticing and admiring them. I am absolutely in LOVE with my floors!


Thank you for reading this all the way through. I hope my story was informative and there are bits that you found valuable. If you’re interested in transforming your floors and have any questions please reach out. I’m happy to help!


Want to transform your floors? Questions? Ask me anything!
You May Also Like


